

Zabbix 部署
Zabbix 部署环境准备
Zabbix 版本选择
Zabbix 产品周期
https://www.zabbix.com/cn/life_cycle_and_release_policy
Zabbix 分为两种版本: LTS和标准版本
Zabbix LTS
LTS代表“长期支持版本”。Zabbix LTS版本每一年半发布一次,且为Zabbix客户提供五年的支持服务,而标准版只有7个月
- 3年全面支持 - 支持修复基础的、紧急的以及安全性上的问题
- 2年最低限度支持 - 仅限支持修复紧急的和安全性上的问题
Zabbix LTS(长期支持)版本没有任何额外的或隐藏的消费成本。Zabbix是一个100%开源软件,每个人都可以下载使用。
Zabbix LTS 特点:
- 支持期限更长,例如:为潜在的安全问题及bug迭代更新
- 令人期待的高质量更新以及全新的功能点
- 快速更新,可适用于多变的复杂环境
- 在版本升级方面,更容易规划管理
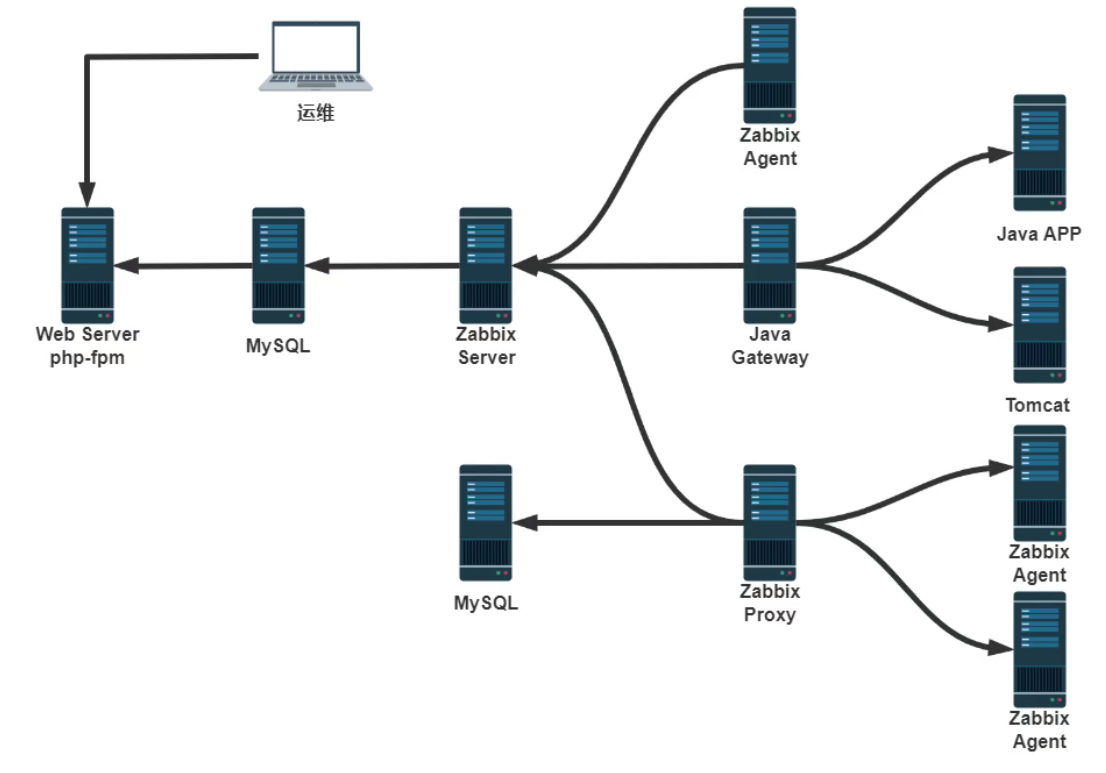
Zabbix 部署架构
Zabbix 安装要求
安装官方要求
https://www.zabbix.com/documentation/7.0/zh/manual/installation/requirements
https://www.zabbix.com/documentation/6.0/zh/manual/installation/requirements
https://www.zabbix.com/documentation/5.0/zh/manual/installation/requirements
安装 Zabbix Server
Zabbix Server 安装方法介绍
Zabbix Server 提供了三种安装方法
- 二进制包安装: 官方提供了二进制包安装的方法,可以支持CentOS和Debian/Ubuntu的安装
- 源码编译安装: 部署繁琐,生产环境定制安装可以使用
- 基于容器安装: 测试环境使用,参考链接如下
https://www.zabbix.com/documentation/7.0/zh/manual/installation/containers
https://www.zabbix.com/documentation/6.0/zh/manual/installation/containers
https://www.zabbix.com/documentation/5.0/zh/manual/installation/containers
二进制包安装 Zabbix Server
官方提供对多种OS版本的Zabbix 安装
可以从 ZABBIX 官方的软件仓库或镜像网站安装Zabbix SIA 提供了官方的 RPM 和 DEB 发行包
注意:Ubuntu22.04 不支持 Zabbix Server 5.0,只支持 Zabbix Server 6.0以上版本
二进制包安装Zabbix官方参考文档:
#Zabbix6.0
https://www.zabbix.com/documentation/6.0/zh/manual/installation/install_from_pac
kages/
#Zabbix5.0
https://www.zabbix.com/documentation/5.0/zh/manual/installation/install_from_packages
https://www.zabbix.com/documentation/5.0/zh/manual/installation/install_from_packages/rhel_centos
https://www.zabbix.com/documentation/5.0/zh/manual/installation/install_from_packages/debian_ubuntu
#Zabbix4.0
https://www.zabbix.com/documentation/4.0/zh/manual/installation/install_from_packages
https://www.zabbix.com/documentation/4.0/zh/manual/installation/install_from_packages/rhel_centos
https://www.zabbix.com/documentation/4.0/manual/installation/install_from_packages/debian_ubuntu
官方和镜像仓库
#官方包仓库:
https://repo.zabbix.com/
#镜像源
https://mirrors.aliyun.com/zabbix/
https://mirrors.tuna.tsinghua.edu.cn/zabbix/
Zabbix 相关二进制包介绍
zabbix-server-mysql 		#Zabbix Server服务器包
zabbix-frontend-php 		#Zabbix 前端Web服务包,本质为LAP
abbix-apache-conf 			#Zabbix 前端Web服务配置包,本质为LAP
zabbix-agent 				#Zabbix 客户端包
zabbix-agent2 				#Zabbix 客户端包
zabbix-get 					#Zabbix 服务测试包
安装 Zabbix Server 包
访问链接: https://www.zabbix.com/download 找到仓库的源
#CentOS8安装Zabbix5.0
https://www.zabbix.com/download?
zabbix=5.0&os_distribution=centos&os_version=8&db=mysql&ws=apache
#Ubuntu18.04安装Zabbix5.0
https://www.zabbix.com/download?
zabbix=5.0&os_distribution=ubuntu&os_version=18.04_bionic&db=mysql&ws=apache
#CentOS8安装Zabbix4.0
https://www.zabbix.com/download?
zabbix=4.0&os_distribution=centos&os_version=8&db=mysql&ws=apache
#Ubuntu18.04安装Zabbix4.0
https://www.zabbix.com/download?
zabbix=4.0&os_distribution=ubuntu&os_version=18.04_bionic&db=mysql&ws=apache
范例: 在ubuntu18.04 安装 Zabbix Server 5.0
#官网下载
[root@zabbix-server ~]#wget https://repo.zabbix.com/zabbix/5.0/ubuntu/pool/main/z/zabbix-release/zabbix-release_5.0-1+bionic_all.deb

#镜像下载
[root@zabbix-server ~]#wget https://mirrors.aliyun.com/zabbix/zabbix/5.0/ubuntu/pool/main/z/zabbix-release/zabbix-release_5.0-1+bionic_all.deb

[root@zabbix-server ~]#dpkg -L zabbix-release
/.
/etc
/etc/apt
/etc/apt/sources.list.d
/etc/apt/sources.list.d/zabbix.list
/etc/apt/trusted.gpg.d
/etc/apt/trusted.gpg.d/zabbix-official-repo.gpg
/usr
/usr/share
/usr/share/doc
/usr/share/doc/zabbix-release
/usr/share/doc/zabbix-release/README.Debian
/usr/share/doc/zabbix-release/changelog.Debian
/usr/share/doc/zabbix-release/copyright

[root@zabbix-server ~]#cat /etc/apt/sources.list.d/zabbix.list
deb http://repo.zabbix.com/zabbix/5.0/ubuntu bionic main
deb-src http://repo.zabbix.com/zabbix/5.0/ubuntu bionic main

#镜像加速
[root@zabbix-server ~]#sed -i.bak 's#http://repo.zabbix.com#https://mirrors.aliyun.com/zabbix#' /etc/apt/sources.list.d/zabbix.list
[root@zabbix-server ~]#cat /etc/apt/sources.list.d/zabbix.list
deb https://mirrors.aliyun.com/zabbix/zabbix/5.0/ubuntu bionic main
deb-src https://mirrors.aliyun.com/zabbix/zabbix/5.0/ubuntu bionic main

[root@zabbix-server ~]#apt update

#安装包
[root@zabbix-server ~]#apt -y install zabbix-server-mysql zabbix-frontend-php zabbix-apache-conf zabbix-agent zabbix-get

#安装MySQL
[root@zabbix-server ~]#apt install mysql-server -y

#如果MySQL和ZabbixServer在同一台主机,此项可不改
[root@zabbix-server ~]#vim /etc/mysql/mysql.conf.d/mysqld.cnf
bind-address = 0.0.0.0
[root@zabbix-server ~]#systemctl restart mysql.service

#准备数据库和用户
[root@zabbix-server ~]#mysql -uroot
mysql> create database zabbix character set utf8 collate utf8_bin;
mysql> create user zabbix@localhost identified by '123456';
mysql> grant all privileges on zabbix.* to zabbix@localhost;
mysql> quit;

#初绐化数据库的表
[root@zabbix-server ~]#zcat /usr/share/doc/zabbix-server-mysql*/create.sql.gz | mysql -uzabbix -p123456 zabbix

#修改Zabbix Server 连接MySQL
[root@zabbix-server ~]#vim /etc/zabbix/zabbix_server.conf
DBPassword=123456

#修改PHP配置
[root@zabbix-server ~]#vim /etc/zabbix/apache.conf
	php_value date.timezone Asia/Shanghai

[root@zabbix-server ~]#systemctl restart zabbix-server zabbix-agent apache2
[root@zabbix-server ~]#systemctl is-active zabbix-server zabbix-agent apache2
active
active
active

[root@zabbix-server ~]#systemctl enable zabbix-server zabbix-agent apache2

#安装中文包
[root@zabbix-server ~]#apt -y install language-pack-zh-hans

#安装日文包
[root@zabbix-server ~]#apt install language-pack-ja

[root@zabbix-server ~]#systemctl restart apache2

#浏览器访问
http://server_ip_or_name/zabbix
范例:在 CentOS 8上实现安装Zabbix Server
#Zabbix5.0
[root@zabbix-server ~]#rpm -Uvh https://repo.zabbix.com/zabbix/5.0/rhel/8/x86_64/zabbix-release-5.0-1.el8.noarch.rpm

#Zabbix4.0
[root@zabbix-server ~]#rpm -Uvh https://repo.zabbix.com/zabbix/4.0/rhel/8/x86_64/zabbix-release-4.0-2.el8.noarch.rpm

#修改为阿里云源
[root@zabbix-server ~]#vim /etc/yum.repos.d/zabbix.repo
[zabbix]
name=Zabbix Official Repository - $basearch
baseurl=https://mirrors.aliyun.com/zabbix/zabbix/4.0/rhel/8/x86_64/
enabled=1
gpgcheck=1
gpgkey=file:///etc/pki/rpm-gpg/RPM-GPG-KEY-ZABBIX-A14FE591
#或者sed修改
[root@zabbix-server ~]#sed -i.bak 's/repo.zabbix.com/mirrors.aliyun.com\/zabbix/' /etc/yum.repos.d/zabbix.repo

[root@zabbix-server ~]#dnf clean all

[root@zabbix-server ~]#dnf install zabbix-server-mysql zabbix-web-mysql zabbix-agent zabbix-get

[root@zabbix-server ~]#zabbix_server -V
zabbix_server (Zabbix) 5.0.14
Revision 892ce506db 16 July 2021, compilation time: Jul 16 2021 14:45:07
Copyright (C) 2021 Zabbix SIA
License GPLv2+: GNU GPL version 2 or later <http://gnu.org/licenses/gpl.html>.
This is free software: you are free to change and redistribute it according to
the license. There is NO WARRANTY, to the extent permitted by law.
This product includes software developed by the OpenSSL Project
for use in the OpenSSL Toolkit (http://www.openssl.org/).
Compiled with OpenSSL 1.1.1 11 Sep 2018
Running with OpenSSL 1.1.1 11 Sep 2018
准备数据库和数据表
准备数据库
[root@zabbix-server ~]#yum -y install mysql-server
[root@zabbix-server ~]#systemctl enable --now mysqld
[root@zabbix-server ~]#mysql -uroot -p
Enter password:
mysql> create database zabbix character set utf8 collate utf8_bin;
mysql> create user zabbix@localhost identified by '123456';
mysql> grant all privileges on zabbix.* to zabbix@localhost;

#如果MySQL 和 Zabbix Server不在同一台主机
mysql> create user zabbix@'10.0.0.%' identified by '123456';
mysql> grant all privileges on zabbix.* to zabbix@'10.0.0.%';
#注意: 如果使用MySQL8.0还需要执行下面
mysql>ALTER USER zabbix@'10.0.0.%' IDENTIFIED WITH mysql_native_password BY '123456';
#或者执行下面
[root@zabbix-server ~]#echo 'default-authentication-plugin=mysql_native_password' >> /etc/my.cnf.d/mysql-server.cnf
[root@zabbix-server ~]#systemctl enable --now mysqld
导入数据表
[root@zabbix-server ~]#zcat /usr/share/doc/zabbix-server-mysql*/create.sql.gz | mysql -uzabbix -p123456 zabbix
[root@zabbix-server ~]#mysql -uzabbix -p123456 zabbix -e 'show tables;'
mysql: [Warning] Using a password on the command line interface can be insecure.
+----------------------------+
| Tables_in_zabbix |
+----------------------------+
| acknowledges |
| actions |
| alerts |
| application_discovery |
| application_prototype |
| application_template |
| applications |
修改 zabbix 的配置文件
[root@zabbix-server ~]#vim /etc/zabbix/zabbix_server.conf

[root@zabbix-server ~]#grep '^[^#]' /etc/zabbix/zabbix_server.conf
LogFile=/var/log/zabbix/zabbix_server.log
LogFileSize=0
PidFile=/var/run/zabbix/zabbix_server.pid
SocketDir=/var/run/zabbix
DBName=zabbix
DBUser=zabbix
DBPassword=123456
SNMPTrapperFile=/var/log/snmptrap/snmptrap.log
Timeout=4
AlertScriptsPath=/usr/lib/zabbix/alertscripts
ExternalScripts=/usr/lib/zabbix/externalscripts
LogSlowQueries=3000
修改 php 相关配置文件
修改正确的时区信息
[root@zabbix-server ~]#vim /etc/php-fpm.d/zabbix.conf
[root@zabbix-server ~]#cat /etc/php-fpm.d/zabbix.conf
[zabbix]
user = apache
group = apache

listen = /run/php-fpm/zabbix.sock
listen.acl_users = apache,nginx
listen.allowed_clients = 127.0.0.1

pm = dynamic
pm.max_children = 50
pm.start_servers = 5
pm.min_spare_servers = 5
pm.max_spare_servers = 35

php_value[session.save_handler] = files
php_value[session.save_path] = /var/lib/php/session

php_value[max_execution_time] = 300
php_value[memory_limit] = 128M
php_value[post_max_size] = 16M
php_value[upload_max_filesize] = 2M
php_value[max_input_time] = 300
php_value[max_input_vars] = 10000
php_value[date.timezone] = Asia/Shanghai #只需要修改此行
启动 Zabbix 相关服务
[root@zabbix-server ~]#systemctl enable --now zabbix-server zabbix-agent httpd php-fpm

[root@zabbix-server ~]#ss -ntl
State Recv-Q Send-Q Local Address:Port Peer
Address:Port
LISTEN 0 128 0.0.0.0:10050 0.0.0.0:*
LISTEN 0 128 0.0.0.0:10051 0.0.0.0:*
LISTEN 0 128 0.0.0.0:22 0.0.0.0:*
LISTEN 0 100 127.0.0.1:25 0.0.0.0:*
LISTEN 0 128 [::]:10050 [::]:*
LISTEN 0 128 [::]:10051 [::]:*
LISTEN 0 70 *:33060 *:*
LISTEN 0 128 *:3306 *:*
LISTEN 0 128 *:80 *:*
LISTEN 0 128 [::]:22 [::]:*
LISTEN 0 100 [::1]:25 [::]:*
访问 Zabbix 的 Web 管理页面完成配置向导
访问下面链接
#基于Nginx
http://server_ip_or_name/
#基于Apache
http://server_ip_or_name/zabbix
上面所填写的内容保存在下面文件中
#如果是CentOS下面文件
/etc/zabbix/web/zabbix.conf.php
#如果是Ubuntu则下面文件
/usr/share/zabbix/conf/zabbix.conf.php 实质也是/etc/zabbix/web/zabbix.conf.php软链接
Zabbix 前端已经就绪!第一次登录, 默认的用户名是 Admin,密码是zabbix
中文及乱码
#CentOS安装中文包,再修改语言,否则无法选择
[root@zabbix-server ~]#yum -y install langpacks-zh_CN

#Ubuntu安装下面中文包
[root@zabbix-server ~]#apt -y install language-pack-zh-hans
因为字体兼容性的原因,在显示中文时可能会有乱码出现
注意:乱码和语言环境无关,英语环境也支持中文显示,但会有乱码
将中文字体上传到 Zabbix Server 的目录 /usr/share/zabbix/assets/fonts 下
#开源字体网站
http://fonts.top/
[root@zabbix-server fonts]#pwd
/usr/share/zabbix/assets/fonts

#支持ttf和ttc后缀的字体文件
[root@zabbix-server fonts]#mv graphfont.ttf graphfont.ttf.bak
[root@zabbix-server fonts]#mv SIMYOU.TTF graphfont.ttf

[root@zabbix-server fonts]#ls
graphfont.ttf graphfont.ttf.bak

#注意:字体文件路径和名称的定义在文件/usr/share/zabbix/include/defines.inc.php中配置
#可以修改下面FONT_NAME指定新字体件,注意不需加文件后缀
[root@zabbix-server ~]#grep FONT_NAME /usr/share/zabbix/include/defines.inc.php
define('ZBX_GRAPH_FONT_NAME', 'graphfont'); // font file name define('ZBX_FONT_NAME', 'graphfont');
再次刷新页面,乱码问题解决
案例: 在Ubuntu20.04 安装 Zabbix Server 6.0
https://www.zabbix.com/cn/download?zabbix=6.0&os_distribution=ubuntu&os_version=20.04_focal&db=mysql&ws=nginx
#Install Zabbix repository
[root@ubuntu2004 ~]#wget
https://repo.zabbix.com/zabbix/6.0/ubuntu/pool/main/z/zabbix-release/zabbix-release_6.0-1+ubuntu20.04_all.deb

[root@ubuntu2004 ~]#dpkg -i zabbix-release_6.0-1+ubuntu20.04_all.deb

[root@ubuntu2004 ~]#cat /etc/apt/sources.list.d/zabbix.list
deb https://repo.zabbix.com/zabbix/6.0/ubuntu focal main
deb-src https://repo.zabbix.com/zabbix/6.0/ubuntu focal main

#加速,更新为国内源(可选)
[root@ubuntu2004 ~]#sed -i.bak 's#https://repo.zabbix.com#https://mirrors.aliyun.com/zabbix#' /etc/apt/sources.list.d/zabbix.list

[root@ubuntu2004 ~]#cat /etc/apt/sources.list.d/zabbix.list
deb https://mirrors.aliyun.com/zabbix/zabbix/6.0/ubuntu focal main
deb-src https://mirrors.aliyun.com/zabbix/zabbix/6.0/ubuntu focal main

[root@ubuntu2004 ~]#apt update

#安装Zabbix server,Web前端,agent2
[root@ubuntu2004 ~]#apt -y install zabbix-server-mysql zabbix-frontend-php zabbix-nginx-conf zabbix-sql-scripts zabbix-agent2 zabbix-get

#安装nginx
[root@ubuntu2004 ~]#nginx -v
nginx version: nginx/1.18.0 (Ubuntu)

#安装php-fpm
[root@ubuntu2004 ~]#php-fpm7.4 -v
PHP 7.4.3 (fpm-fcgi) (built: May 6 2022 00:16:42)
Copyright (c) The PHP Group
Zend Engine v3.4.0, Copyright (c) Zend Technologies
with Zend OPcache v7.4.3, Copyright (c), by Zend Technologies

#安装zabbix_agent2
[root@ubuntu2004 ~]#zabbix_agent2 -V
zabbix_agent2 (Zabbix) 6.0.5
.......

#创建初始数据库
[root@ubuntu2004 ~]#apt -y install mysql-server
[root@ubuntu2004 ~]#mysql
Server version: 8.0.29-0ubuntu0.20.04.3 (Ubuntu)
mysql> create database zabbix character set utf8mb4 collate utf8mb4_bin;
mysql> create user zabbix@localhost identified by '123456';
mysql> grant all privileges on zabbix.* to zabbix@localhost;
mysql> set global log_bin_trust_function_creators = 1;
mysql> quit;

#导入初始架构和数据,系统将提示您输入新创建的密码。
[root@ubuntu2004 ~]#zcat /usr/share/doc/zabbix-sql-scripts/mysql/server.sql.gz | mysql -uzabbix -p123456 zabbix

#验证数据库和表
[root@ubuntu2004 ~]#mysql -uzabbix -p123456 zabbix -e 'show tables;' |head
mysql: [Warning] Using a password on the command line interface can be insecure.
Tables_in_zabbix
acknowledges
actions
alerts
auditlog
autoreg_host
conditions
config
config_autoreg_tls
corr_condition

[root@ubuntu2004 ~]#mysql -uroot -p
password
mysql> set global log_bin_trust_function_creators = 0;
mysql> quit;

#为Zabbix server配置数据库
[root@ubuntu2004 ~]#vim /etc/zabbix/zabbix_server.conf
DBPassword=123456

#确认数据库配置
[root@ubuntu2004 ~]#grep -E '^DB|DBHost=' /etc/zabbix/zabbix_server.conf
# DBHost=localhost
DBName=zabbix
DBUser=zabbix
DBPassword=123456

#为Zabbix前端配置PHP
[root@ubuntu2004 ~]#vim /etc/zabbix/nginx.conf
#取消下面两行的注释并修改
        listen 80;
        server_name zabbix.ayaka.org;

#默认安装apache2和nginx冲突,禁用apache2
[root@ubuntu2004 ~]#systemctl disable --now apache2.service

#重启服务
[root@ubuntu2004 ~]#systemctl restart zabbix-server zabbix-agent2 nginx php7.4-fpm

[root@ubuntu2004 ~]#systemctl enable zabbix-server zabbix-agent2 nginx php7.4-fpm

#配置Zabbix前端
#连接到新安装的Zabbix前端: http://server_ip_or_name
#根据Zabbix文件里步骤操作: Installing frontend
初始页面,可以修改语言
登录Web 管理页面,第一次登录, 默认的用户名是 Admin,密码是zabbix
在Windows中找一个中文字体
将字体上传到 Zabbix Server
[root@ubuntu2004 ~]#ls
MSYHBD.TTC MSYHL.TTC MSYH.TTC

[root@ubuntu2004 ~]#dpkg -L zabbix-frontend-php |grep fonts
/usr/share/zabbix/assets/fonts
/usr/share/zabbix/fonts

[root@ubuntu2004 ~]#ll /usr/share/zabbix/assets/fonts/graphfont.ttf
lrwxrwxrwx 1 root root 38 6月 9 21:13
/usr/share/zabbix/assets/fonts/graphfont.ttf -> /etc/alternatives/zabbix-
frontend-font
[root@ubuntu2004 ~]#ll /etc/alternatives/zabbix-frontend-font
lrwxrwxrwx 1 root root 47 6月 9 21:13 /etc/alternatives/zabbix-frontend-font ->
/usr/share/fonts/truetype/dejavu/DejaVuSans.ttf
[root@ubuntu2004 ~]#ll /usr/share/fonts/truetype/dejavu/DejaVuSans.ttf
-rw-r--r-- 1 root root 757076 7月 30 2016
/usr/share/fonts/truetype/dejavu/DejaVuSans.ttf
[root@ubuntu2004 ~]#ls /usr/share/fonts/truetype/dejavu/
DejaVuMathTeXGyre.ttf DejaVuSansMono-BoldOblique.ttf
DejaVuSerifCondensed-BoldItalic.ttf
DejaVuSans-BoldOblique.ttf DejaVuSansMono-Bold.ttf
DejaVuSerifCondensed-Bold.ttf
DejaVuSans-Bold.ttf DejaVuSansMono-Oblique.ttf
DejaVuSerifCondensed-Italic.ttf
DejaVuSansCondensed-BoldOblique.ttf DejaVuSansMono.ttf
DejaVuSerifCondensed.ttf
DejaVuSansCondensed-Bold.ttf DejaVuSans-Oblique.ttf DejaVuSerif-
Italic.ttf
DejaVuSansCondensed-Oblique.ttf DejaVuSans.ttf
DejaVuSerif.ttf
DejaVuSansCondensed.ttf DejaVuSerif-BoldItalic.ttf
DejaVuSans-ExtraLight.ttf DejaVuSerif-Bold.ttf

[root@ubuntu2004 ~]#mv /usr/share/fonts/truetype/dejavu/DejaVuSans.ttf{,.bak}
[root@ubuntu2004 ~]#ls
MSYHBD.TTC MSYHL.TTC MSYH.TTC

#找一个字体替换默认字体
root@ubuntu2004 ~]#mv MSYH.TTC /usr/share/fonts/truetype/dejavu/DejaVuSans.ttf
编译安装 Zabbix Server
官方源码编译安装参考文档
https://www.zabbix.com/documentation/7.0/zh/manual/installation/install
https://www.zabbix.com/documentation/6.0/zh/manual/installation/install
https://www.zabbix.com/documentation/5.0/zh/manual/installation/install
安装相关包
CentOS 安装相关包
[root@zabbix-server ~]#yum -y install gcc pcre-devel libxml2-devel php-bcmath php-mbstring net-snmp net-snmp-devel curl-devel php php-gd php-xml libevent-devel java-1.8.0-openjdk-devel mariadb mariadb-devel
Ubuntu 安装相关包
[root@ubuntu1804 ~]#apt update
[root@ubuntu1804 ~]#apt -y install apache2 apache2-bin apache2-data apache2-utils fontconfig-config fonts-dejavu-core fping libapache2-mod-php libapache2-mod-php7.2 libapr1 libapruti11 1ibaprutil1-dbd-sq7ite3 libaprutil1-ldap 1ibfontconfig1 libgd3 libikseme13 libjbig0 libjpeg-turbo8 libjpeg8 liblua5.2-0 libodbc1 libopenipmi0 libsensors4 libsnmp-base libsnmp30 libsodium23 1ibssh2-1 1ibtiff5 7ibwebp6 1ibxpm4 php-bcmath php-common php-gd php7.2-common php7.2-gd php7.2-json php7.2-1dap php7.2-mbstring php7.2-mysq1 php7.2-opcache php7.2-read1ine libxm12-dev libxm12 snmp libsnmp-dev libevent-dev openjdk-8-jdk libcurl4-openss1-dev php7.2-xm7 snmpd ss1-cert ttf-dejavu-core libmysqlclient-dev
创建用户和组
[root@zabbix-server ~]#groupadd zabbix
[root@zabbix-server ~]#useradd -g zabbix zabbix
下载源码包
下载链接:
https://www.zabbix.com/cn/download_sources
[root@zabbix-server ~]#cd /usr/local/src
[root@zabbix-server src]#wget https://cdn.zabbix.com/zabbix/sources/stable/6.0/zabbix-6.0.4.tar.gz
编译安装
官方链接
https://www.zabbix.com/documentation/7.0/zh/manual/installation/install
https://www.zabbix.com/documentation/6.0/zh/manual/installation/install
https://www.zabbix.com/documentation/5.0/zh/manual/installation/install
范例:
[root@zabbix-server src]#ls
zabbix-4.0.24.tar.gz
[root@zabbix-server src]#tar xf zabbix-4.0.24.tar.gz
[root@zabbix-server zabbix-4.0.24]#./configure --prefix=/apps/zabbix_server --enable-server --enable-agent --enable-java --with-mysql --with-net-snmp --with-libcurl --with-libxml

#选项说明
--prefix=/apps/zabbix #指定安装目录
--enab1e-server #安装zabbix server
--enab1e-agent #启用zabbix agent
--enable-agent2 #启用zabbix agent2(需要go环境)
--enab1e-proxy #启用proxy的支持
--enable-java #启用java-gateway支持
--with-mysql #使用 MySQL 客户端库
--with-net-snmp #启用Net-SNMP包
--with-libcurl #启用curl包
--with-libxml #启用libxml2客户端库

......
Enable Java gateway: yes
Java gateway details:
Java compiler: javac
Java archiver: jar
LDAP support: no
IPv6 support: no
***********************************************************
* Now run 'make install' 									*
* 															*
* Thank you for using Zabbix! 								*
* <http://www.zabbix.com> 									*
***********************************************************

[root@zabbix-server zabbix-4.0.24]#make -j 2
[root@zabbix-server zabbix-4.0.24]#make install
[root@zabbix-server ~]#ls /apps/zabbix_server/
bin etc lib sbin share

#创建软链接
[root@zabbix-server ~]#ln -s /apps/zabbix_server/sbin/* /usr/sbin/
[root@zabbix-server ~]#ln -s /apps/zabbix_server/bin/* /usr/bin/
[root@zabbix-server ~]#zabbix_<TAB><TAB>
zabbix_agentd zabbix_get zabbix_sender zabbix_server

#或者
[root@zabbix-server ~]#echo 'PATH=/apps/zabbix_server/bin:$PATH' > /etc/profile.d/zabbix.sh
[root@zabbix-server ~]#. /etc/profile.d/zabbix.sh
准备数据库和相关表
注意:生产环境监控数据比较多,占用空间可能会达到T级别以上,数据库的磁盘需要预留足够的空间
安装MySQL
#安装MySQL8.0
[root@zabbix-mysql-master ~]##yum -y install mysql-server
[root@zabbix-mysql-master ~]#systemctl enable --now mysqld
[root@zabbix-mysql-server ~]#mysql -uroot -p
Enter password:
mysql> create database zabbix character set utf8 collate utf8_bin;
mysql> create user 'zabbix'@'10.0.0.%' identified by '123456';
mysql> grant all privileges on zabbix.* to 'zabbix'@'10.0.0.%';

#注意: 如果使用MySQL8.0和Zabbix不在同一主机,还需要执行下面
mysql>ALTER USER zabbix@'10.0.0.%' IDENTIFIED WITH mysql_native_password BY '123456';
#或者执行下面
[root@zabbix-mysql-master ~]#echo 'default-authentication-plugin=mysql_native_password' >> /etc/my.cnf.d/mysql-server.cnf
[root@zabbix-mysql-master ~]#systemctl restart mysqld
初始化数据库
[root@zabbix-server ~]#ls /usr/local/src/zabbix-4.0.24/database/mysql/*.sql -1
/usr/local/src/zabbix-4.0.24/database/mysql/data.sql
/usr/local/src/zabbix-4.0.24/database/mysql/images.sql
/usr/local/src/zabbix-4.0.24/database/mysql/schema.sql

[root@zabbix-server ~]#mysql -uzabbix -p123456 -h10.0.0.101 zabbix < /usr/local/src/zabbix-4.0.24/database/mysql/schema.sql
[root@zabbix-server ~]#mysql -uzabbix -p123456 -h10.0.0.101 zabbix < /usr/local/src/zabbix-4.0.24/database/mysql/images.sql
[root@zabbix-server ~]#mysql -uzabbix -p123456 -h10.0.0.101 zabbix < /usr/local/src/zabbix-4.0.24/database/mysql/data.sql
注意: 在CentOS8 安装Mariadb-10.3在导入schema.sql 出下面提示错误,而在CentOS7 安装Mariadb-5.5 无错误
Row size too large. The maximum row size for the used table type, not counting
BLOBs, is 8126. You have to change some columns to TEXT or BLOBs
验证数据库和相关表
[root@zabbix-server ~]#mysql -uzabbix -p123456 -h10.0.0.101 zabbix -e 'show tables;'
+----------------------------+
| Tables_in_zabbix |
+----------------------------+
| acknowledges |
| actions |
| alerts |
| application_discovery |
| application_prototype |
| application_template |
修改 Zabbix Server 配置文件
[root@zabbix-server ~]#vim /apps/zabbix-server/etc/zabbix_server.conf
[root@zabbix-server ~]#grep '^[^#]' /apps/zabbix-server/etc/zabbix_server.conf
LogFile=/tmp/zabbix_server.log
DBHost=10.0.0.101
DBName=zabbix
DBUser=zabbix
DBPassword=123456
DBPort=3306
#Timeout=4
#LogSlowQueries=3000
启动相关服务
[root@zabbix-server ~]#zabbix_server -c /apps/zabbix-server/etc/zabbix_server.conf

[root@zabbix-server ~]#ss -ntl
State Recv-Q Send-Q Local Address:Port Peer
Address:Port
LISTEN 0 128 0.0.0.0:22
0.0.0.0:*
LISTEN 0 100 127.0.0.1:25
0.0.0.0:*
LISTEN 0 128 0.0.0.0:10051
0.0.0.0:*
LISTEN 0 128 [::]:22
[::]:*
LISTEN 0 100 [::1]:25
[::]:*

[root@zabbix-server ~]#tail /tmp/zabbix_server.log
    31096:20200825:144614.763 server #31 started [preprocessing worker #1]
    31098:20200825:144614.764 server #33 started [preprocessing worker #3]
    31097:20200825:144614.771 server #32 started [preprocessing worker #2]
启动httpd服务
[root@zabbix-server ~]#systemctl enable --now httpd
配置php和初始化登录WEB页面
[root@zabbix-server ~]#mkdir /var/www/html/zabbix
[root@zabbix-server ~]#cp -a /usr/local/src/zabbix-4.0.24/frontends/php/. /var/www/html/zabbix/
[root@zabbix-server ~]#ls /var/www/html/zabbix/
actionconf.php assets correlation.php
image.php overview.php srv_status.php
.......
缺失相关包和配置
安装配置后再访问
[root@zabbix-server ~]#yum -y install php-gd php-xml php-json php-mysqlnd
[root@zabbix-server ~]#vim /etc/php.ini
post_max_size = 16M
max_execution_time = 300
max_input_time = 300
date.timezone = Asia/Shanghai
[root@zabbix-server ~]#systemctl restart httpd
创建配置文件
下载配置文件并上传至目录/var/www/html/zabbix/conf/
[root@zabbix-server ~]#cat /var/www/html/zabbix/conf/zabbix.conf.php
<?php
// Zabbix GUI configuration file.
global $DB;
$DB['TYPE'] = 'MYSQL';
$DB['SERVER'] = '10.0.0.101';
$DB['PORT'] = '0';
$DB['DATABASE'] = 'zabbix';
$DB['USER'] = 'zabbix';
$DB['PASSWORD'] = '123456';

// Schema name. Used for IBM DB2 and PostgreSQL.

$DB['SCHEMA'] = '';

$ZBX_SERVER = '10.0.0.100';
$ZBX_SERVER_PORT = '10051';
$ZBX_SERVER_NAME = 'Zabbix Server';

$IMAGE_FORMAT_DEFAULT = IMAGE_FORMAT_PNG;
再次刷新页面,可以看到成功
Zabbix 前端已经就绪!第一次登录, 默认的用户名是 Admin,密码是zabbix
修改PHP文件,防止重复安装
[root@zabbix-server zabbix]#pwd
/var/www/html/zabbix
[root@zabbix-server zabbix]#mv setup.php setup.php.bak
启动 zabbix agent
[root@zabbix-server ~]#zabbix_agentd
[root@zabbix-server ~]#ss -ntl
State Recv-Q Send-Q Local Address:Port Peer
Address:Port
LISTEN 0 128 0.0.0.0:22
0.0.0.0:*
LISTEN 0 100 127.0.0.1:25
0.0.0.0:*
LISTEN 0 128 0.0.0.0:10050
0.0.0.0:*
LISTEN 0 128 0.0.0.0:10051
0.0.0.0:*
LISTEN 0 128 *:80
*:*
LISTEN 0 128 [::]:22
[::]:*
LISTEN 0 100 [::1]:25
[::]:*
[root@zabbix-server ~]#lsof -i:10050
COMMAND PID USER FD TYPE DEVICE SIZE/OFF NODE NAME
zabbix_ag 2912 zabbix 7u IPv4 43326 0t0 TCP *:zabbix-agent (LISTEN)
zabbix_ag 2913 zabbix 7u IPv4 43326 0t0 TCP *:zabbix-agent (LISTEN)
zabbix_ag 2914 zabbix 7u IPv4 43326 0t0 TCP *:zabbix-agent (LISTEN)
zabbix_ag 2915 zabbix 7u IPv4 43326 0t0 TCP *:zabbix-agent (LISTEN)
zabbix_ag 2916 zabbix 7u IPv4 43326 0t0 TCP *:zabbix-agent (LISTEN)
zabbix_ag 2917 zabbix 7u IPv4 43326 0t0 TCP *:zabbix-agent (LISTEN)
验证监控数据
创建 service 文件
Zabbix Server 的 service 文件
[root@zabbix-server ~]#killall zabbix_server
[root@zabbix-server ~]#cat /lib/systemd/system/zabbix-server.service
[Unit]
Description=Zabbix Server
After=syslog.target
After=network.target

[Service]
Environment="CONFFILE=/apps/zabbix_server/etc/zabbix_server.conf"
EnvironmentFile=-/etc/sysconfig/zabbix-server
Type=forking
Restart=on-failure
PIDFile=/tmp/zabbix_server.pid
KillMode=control-group
ExecStart=/apps/zabbix_server/sbin/zabbix_server -c $CONFFILE
ExecStop=/bin/kill -SIGTERM $MAINPID
RestartSec=10s
TimeoutSec=0

[Install]
WantedBy=multi-user.target


[root@zabbix-server ~]#systemctl daemon-reload
[root@zabbix-server ~]#systemctl enable --now zabbix-server.service
Zabbix agent 的 service 文件
[root@zabbix-server ~]#killall zabbix_agentd

[root@zabbix-server ~]#vim /lib/systemd/system/zabbix-agent.service
[Unit]
Description=Zabbix Agent
After=syslog.target
After=network.target

[Service]
Type=forking
Restart=on-failure
PIDFile=/tmp/zabbix_agentd.pid
KillMode=control-group
ExecStart=/apps/zabbix_server/sbin/zabbix_agentd -c
/apps/zabbix_server/etc/zabbix_agentd.conf
ExecStop=/bin/kill -SIGTERM $MAINPID
RestartSec=10s
User=zabbix
Group=zabbix

[Install]
WantedBy=multi-user.target

[root@zabbix-server ~]#systemctl daemon-reload
[root@zabbix-server ~]#systemctl enable --now zabbix-agent.service
实现中文界面
默认是英文界面,不支持中文
安装相关中文包
[root@zabbix-server ~]#localectl list-locales |grep zh
[root@zabbix-server ~]#yum -y install langpacks-zh_CN
[root@zabbix-server ~]#localectl list-locales |grep zh
zh_CN
zh_CN.gb18030
zh_CN.gbk
zh_CN.utf8
zh_HK
zh_HK.utf8
zh_SG
zh_SG.gbk
zh_SG.utf8
zh_TW
zh_TW.euctw
zh_TW.utf8
.......
再次刷新页面可以选择中文
解决乱码问题
当前系统有些监控项部分显示有乱码,是由于web界面显示为中文但是系统没有相关字体,因此需要准备相关字体文件才能正常显示,
#注意: 文件名一定是小写
[root@zabbix-server ~]#ll /var/www/html/zabbix/assets/fonts/
total 66276
-rw-r--r-- 1 wang wang 756072 Aug 24 15:46 DejaVuSans.ttf
-rw-r--r-- 1 root root 11787328 Mar 2 2019 simkai.ttf
-rw-r--r-- 1 root root 6700204 May 17 13:28 simyou.ttf

[root@zabbix-server ~]#sed -i.bak 's/DejaVuSans/simyou/' /var/www/html/zabbix/include/defines.inc.php

#修改下面两行
define('ZBX_GRAPH_FONT_NAME', 'simyou'); // font file name
define('ZBX_FONT_NAME', 'simyou');
容器安装 Zabbix Server
范例
#先安装docker,此步略
#1.创建专用于Zabbix组件容器的网络:
[root@ubuntu1804 ~]#docker network create --subnet 172.20.0.0/16 --ip-range 172.20.240.0/20 zabbix-net

#2.启动空的MySQL服务器实例
#注意:此步官方文档有bug
[root@ubuntu1804 ~]#docker run --name mysql-server -t \
--restart=unless-stopped \
-e MYSQL_DATABASE="zabbix" \
-e MYSQL_USER="zabbix" \
-e MYSQL_PASSWORD="zabbix_pwd" \
-e MYSQL_ROOT_PASSWORD="root_pwd" \
--network=zabbix-net \
-d mysql:8.0 \
--character-set-server=utf8 --collation-server=utf8_bin \
--default-authentication-plugin=mysql_native_password

#3.启动Zabbix Java gateway实例
[root@ubuntu1804 ~]#docker run --name zabbix-java-gateway -t \
--network=zabbix-net \
--restart=unless-stopped \
-d zabbix/zabbix-java-gateway:alpine-5.0-latest

#4.启动Zabbix server实例并将该实例与创建的MySQL服务器实例链接
[root@ubuntu1804 ~]#docker run --name zabbix-server-mysql -t \
-e DB_SERVER_HOST="mysql-server" \
-e MYSQL_DATABASE="zabbix" \
-e MYSQL_USER="zabbix" \
-e MYSQL_PASSWORD="zabbix_pwd" \
-e MYSQL_ROOT_PASSWORD="root_pwd" \
-e ZBX_JAVAGATEWAY="zabbix-java-gateway" \
--network=zabbix-net \
-p 10051:10051 \
--restart=unless-stopped \
-d zabbix/zabbix-server-mysql:alpine-5.0-latest

#5.启动Zabbix Web界面,并将实例与创建的MySQL服务器和Zabbix server实例链接
[root@ubuntu1804 ~]#docker run --name zabbix-web-nginx-mysql -t \
-e ZBX_SERVER_HOST="zabbix-server-mysql" \
-e DB_SERVER_HOST="mysql-server" \
-e MYSQL_DATABASE="zabbix" \
-e MYSQL_USER="zabbix" \
-e MYSQL_PASSWORD="zabbix_pwd" \
-e MYSQL_ROOT_PASSWORD="root_pwd" \
--network=zabbix-net \
-p 80:8080 \
--restart=unless-stopped \
-d zabbix/zabbix-web-nginx-mysql:alpine-5.0-latest

[root@ubuntu1804 ~]#docker ps
CONTAINER ID IMAGE COMMAND
CREATED STATUS PORTS
NAMES
72a464ea73a8 zabbix/zabbix-web-nginx-mysql:alpine-5.0-latest "docker-
entrypoint.sh" 5 minutes ago Up 5 minutes 8443/tcp, 0.0.0.0:80-
>8080/tcp zabbix-web-nginx-mysql
9d239229ebfe mysql:8.0 "docker-
entrypoint.s…" 6 minutes ago Up 6 minutes 3306/tcp, 33060/tcp
mysql-server
6d05971c8622 zabbix/zabbix-server-mysql:alpine-5.0-latest "/sbin/tini
-- /usr/…" 8 minutes ago Up 8 minutes 0.0.0.0:10051->10051/tcp
zabbix-server-mysql
dc77a1cf1ca0 zabbix/zabbix-java-gateway:alpine-5.0-latest "docker-
entrypoint.s…" 19 minutes ago Up 19 minutes 10052/tcp
zabbix-java-gateway

[root@ubuntu1804 ~]#docker images
REPOSITORY TAG IMAGE ID CREATED
SIZE
zabbix/zabbix-web-nginx-mysql alpine-5.0-latest a3fb50be95b6 4 days
ago 162MB
zabbix/zabbix-java-gateway alpine-5.0-latest 0814670cd5ac 4 days
ago 83.6MB
mysql 8.0 c60d96bd2b77 2 weeks ago 514MB
zabbix/zabbix-server-mysql alpine-5.0-latest 6c3836e6aa39 3 weeks
ago 67.3MB

#6.启动Zabbix agent
docker run --name zabbix-agent \
-e ZBX_HOSTNAME="Zabbix server" \
-e ZBX_SERVER_HOST="127.0.0.1" \
--network container:zabbix-server-mysql \
--restart=unless-stopped \
-d zabbix/zabbix-agent:${TAG}

#访问本机的http服务即可,默认用户Admin,密码:zabbix,直接登录无需初始化过程
http://zabbix-server-ip/
安装 Zabbix Agent
Zabbix Agent 需要安装到被监控的主机上,它负责定期收集各项数据,并发送到zabbix server端,zabbix server将数据存储到数据库中,zabbix web 访问数据库在前端进行展现和绘图。
Zabbix Agent 有两个版本:Zabbix Agent 和 Zabbix Agent2
Zabbix Agent 2 是新一代的 Zabbix agent,在Zabbix 4.4的版本时已经推出. 未来可能会代替 Zabbix agent
官方说明
https://www.zabbix.com/documentation/5.0/en/manual/concepts/agent2
Zabbix Agent2 特点
- 减少 TCP 连接的数量
- 基于 go 开发,支持更大的并发性检查
- 插件易于扩展。插件应该能够:
- 提供琐碎的检查,包括只有几个简单的代码行
- 提供复杂的检查,包括长期运行的脚本和独立的数据收集,并定期发回数据
- 是 Zabbix agent 的替代版版本(因为它支持所有以前的功能)
- agent2是多线程模式,agent是多进程模式
对比 Agent和Agent2 官方链接
https://www.zabbix.com/documentation/5.0/zh/manual/appendix/agent_comparison
| 参数 | Zabbix agent | Zabbix agent 2 |
|---|---|---|
| 程序设计语言 | C | 一部分使用 C,其他用 Go |
| 守护进程 | yes | no (Windows 5.0.4 之后版本支持) |
| 扩展支持 | 自定义 C 的可加载模块。 | 自定义 GO 的插件。 |
| 请求 | ||
| 支持平台 | Linux, IBM AIX, FreeBSD, NetBSD, OpenBSD, HP-UX, Mac OS X, Solaris: 9, 10, 11, Windows: 从 xp 开始所有的桌面和服务端版本。 | Linux, Windows: 从 xp 开始所有的桌面和服务端版本。 |
| 支持的加密库 | GnuTLS 3.1.18 and newer OpenSSL 1.0.1, 1.0.2, 1.1.0, 1.1.1 SSL 库 - tested with versions 2.7.4, 2.8.2 (某些限制的使用,查看加密详情页)。 | Linux: OpenSSL 1.0.1 和最新版本在 Zabbix 4.4.8 之后支持。MS Windows: OpenSSL 1.1.1 或者最新版。OpenSSL 库必须开启 PSK,否则 LibreSSL 不支持。 |
| 监控进程 | ||
| 进程 | 每个 server/proxy 都有独立的进程。 | 单个进程多线程。这最大的线程数由 GOMAXPROCS 环境变量决定。 |
| 指标 | UNIX: 查看支持的 items。Windows: 查看指定 Windows 版本的监控项。 | UNIX: Zabbix agent 支持所有指标。其他的,agent2 提供 Docker, Memcached, MySQL, PostgreSQL, Redis, systemd 等监控项。Windows: Zabbix agent 支持所有指标和 HTTPS 检查 net.tcp.service*, LDAP。其他的,agent2 提供关于 PostgreSQL, Redis 的 Zabbix-native 监控方案。 |
| 并发 | 单进程按监控项顺序进行检查 | 来自不同插件的检查或一个插件内的多个检查可以同时执行。 |
| 计划/灵活间隔 | 仅支持被动检查。 | 支持主动检查。 |
| 第三方 traps | no | yes |
| Additional features | ||
| 永久存储 | no | yes |
| 超时设置 | 只能定义 agent 级别。 | 超时插件可以覆盖在 agent 上的级别超时设置。 |
| 删除用户权限 | yes (Unix-like systems only) | no |
| 用户可配置密码套件 | yes | no |
安装Zabbix Agent 有三种方式
- 包安装
- 二进制安装
- 编译安装
包安装 Zabbix Agent
Linux 安装 Zabbix Agent
可以从官方或国内镜像站点下载
https://www.zabbix.com/cn/download
https://repo.zabbix.com/zabbix/
安装说明
https://www.zabbix.com/cn/download
范例:在ubuntu22.04 安装 Zabbix Agent 6.0
[root@ubuntu2204 ~]#wget https://repo.zabbix.com/zabbix/6.0/ubuntu/pool/main/z/zabbix-release/zabbix-release_6.0-4+ubuntu22.04_all.deb

[root@ubuntu2204 ~]#dpkg -i zabbix-release_6.0-4+ubuntu22.04_all.deb

[root@ubuntu2204 ~]#ls /etc/apt/sources.list.d
zabbix-agent2-plugins.list zabbix.list

[root@ubuntu2204 ~]#apt update && apt -y install zabbix-agent

[root@ubuntu2204 ~]#ss -ntl
State Recv-Q Send-Q Local
Address:Port Peer Address:Port Process
LISTEN 0 4096
127.0.0.53%lo:53 0.0.0.0:*
LISTEN 0 128
0.0.0.0:22 0.0.0.0:*
LISTEN 0 128
127.0.0.1:6010 0.0.0.0:*
LISTEN 0 4096
0.0.0.0:10050 0.0.0.0:*
LISTEN 0 128
[::]:22 [::]:*
LISTEN 0 128
[::1]:6010 [::]:*
LISTEN 0 4096
[::]:10050 [::]:*

[root@ubuntu2204 ~]#systemctl status zabbix-agent.service
范例:在ubuntu22.04 安装 Zabbix Agent2 6.0
[root@ubuntu2204 ~]#wget https://repo.zabbix.com/zabbix/6.0/ubuntu/pool/main/z/zabbix-release/zabbix-release_6.0-4%2Bubuntu22.04_all.deb

[root@ubuntu2204 ~]#dpkg -i zabbix-release_6.0-4+ubuntu22.04_all.deb
[root@ubuntu2204 ~]#apt update

[root@ubuntu2204 ~]#apt -y install zabbix-agent2 zabbix-agent2-plugin-*

#修改配置
[root@ubuntu2204 ~]#vim /etc/zabbix/zabbix_agent2.conf
Server=zabbix.ayaka.org
[root@ubuntu2204 ~]#systemctl restart zabbix-agent2
[root@ubuntu2204 ~]#systemctl enable zabbix-agent2
范例: 在ubuntu20.04 安装 Zabbix Agent2 6.0
[root@ubuntu2004 ~]# wget https://repo.zabbix.com/zabbix/6.0/ubuntu/pool/main/z/zabbix-release/zabbix-release_6.0-1+ubuntu20.04_all.deb
[root@ubuntu2004 ~]#dpkg -i zabbix-release_6.0-1+ubuntu20.04_all.deb
[root@ubuntu2004 ~]#apt update
#安装agent2
[root@ubuntu2004 ~]#apt install zabbix-agent2

#修改配置
[root@ubuntu2004 ~]#vim /etc/zabbix/zabbix_agent2.conf
Server=zabbix.ayaka.org

[root@ubuntu2004 ~]#systemctl restart zabbix-agent2.service

[root@ubuntu2004 ~]#ss -ntlp|grep zabbix
LISTEN 0 128 *:10050 *:* users:
(("zabbix_agent2",pid=1317,fd=8))

#注意: 后续还需要在Zabbix Server 添加此主机才能实现监控
Windows 上安装 Agent2
官方下载链接
https://www.zabbix.com/cn/download_agents?version=6.0+LTS&release=6.0.5&os=Windows&os_version=Any&hardware=amd64&encryption=OpenSSL&packaging=MSI&show_legacy=0
验证端口
C:\Users\lbtoo>netstat -an| find "10050"
    TCP 0.0.0.0:10050 0.0.0.0:0 LISTENING
    TCP [::]:10050 [::]:0 LISTENING
二进制安装 Zabbix Agent
官方提供了针对不同的OS编译好的程序,进行配置后即可直接使用
注意: 此方式在CentOS 8 上存在问题
官方下载链接:
https://www.zabbix.com/download_agents?version=4.0+LTS&release=4.0.24&os=Linux&os_version=3.0&hardware=amd64&encryption=No+encryption&packaging=Archive
[root@centos7 ~]#wget https://cdn.zabbix.com/zabbix/binaries/stable/5.0/5.0.14/zabbix_agent-5.0.14-linux-3.0-amd64-static.tar.gz

[root@centos7 ~]#wget https://www.zabbix.com/downloads/4.0.24/zabbix_agent-4.0.24-linux-3.0-amd64-static.tar.gz

[root@centos7 ~]#mkdir -p /apps/zabbix_agent
[root@centos7 ~]#tar xf zabbix_agent-4.0.24-linux-3.0-amd64-static.tar.gz -C /apps/zabbix_agent/
[root@centos7 ~]#tree /apps/zabbix_agent/
/apps/zabbix_agent/
├── bin
│ ├── zabbix_get
│ └── zabbix_sender
├── conf
│ ├── zabbix_agentd
│ │ ├── userparameter_examples.conf
│ │ └── userparameter_mysql.conf
│ └── zabbix_agentd.conf
└── sbin
└── zabbix_agentd
4 directories, 6 files

[root@centos7 ~]#echo 'PATH=/apps/zabbix_agent/bin:/apps/zabbix_agent/sbin:$PATH'> /etc/profile.d/zabbix_agent.sh
[root@centos7 ~]#. /etc/profile.d/zabbix_agent.sh

#修改配置
[root@centos7 ~]#HOST=`hostname -I`
[root@centos7 ~]#sed -i.bak -e "s/Server=127.0.0.1/Server=10.0.0.100/" -e "s/Hostname=Zabbix server/Hostname=$HOST/" /apps/zabbix_agent/etc/zabbix_agentd.conf

#启动服务
[root@centos7 ~]#/apps/zabbix_agent/sbin/zabbix_agentd -c /apps/zabbix_agent/conf/zabbix_agentd.conf
zabbix_agentd [1370]: user zabbix does not exist
zabbix_agentd [1370]: cannot run as root!

[root@centos7 ~]#useradd zabbix
[wang@centos7 ~]$/apps/zabbix_agent/sbin/zabbix_agentd -c /apps/zabbix_agent/conf/zabbix_agentd.conf
[root@centos7 ~]#ss -ntl
State Recv-Q Send-Q Local Address:Port Peer Address:Port
LISTEN 0 128 *:22 *:*
LISTEN 0 100 127.0.0.1:25 *:*
LISTEN 0 128 *:10050 *:*
LISTEN 0 128 [::]:22 [::]:*
LISTEN 0 100 [::1]:25 [::]:*

[root@centos7 ~]#killall zabbix_agentd

[root@centos7 ~]#vim /lib/systemd/system/zabbix-agent.service
[Unit]
Description=Zabbix Agent
After=syslog.target
After=network.target

[Service]
Type=forking
Restart=on-failure
PIDFile=/tmp/zabbix_agentd.pid
KillMode=control-group
ExecStart=/apps/zabbix_agent/sbin/zabbix_agentd -c
/apps/zabbix_agent/conf/zabbix_agentd.conf
ExecStop=/bin/kill -SIGTERM $MAINPID
RestartSec=10s
User=zabbix
Group=zabbix

[Install]
WantedBy=multi-user.target

[root@zabbix-server ~]#systemctl daemon-reload
[root@zabbix-server ~]#systemctl enable --now zabbix-agent.service
编译安装 Zabbix Agent
编译安装 zabbix agent 和 zabbix server 是同一个源码包,只需指定不同的编译选项即可
[root@centos8 ~]#yum -y install gcc pcre-devel
[root@centos8 ~]#useradd zabbix
[root@centos8 ~]#wget https://cdn.zabbix.com/zabbix/sources/stable/4.0/zabbix-4.0.24.tar.gz
[root@centos8 ~]#tar xf zabbix-4.0.24.tar.gz
[root@centos8 ~]#cd zabbix-4.0.24/
[root@centos8 zabbix-4.0.24]#./configure --prefix=/apps/zabbix_agent --enable-agent

[root@centos8 zabbix-4.0.24]#make && make install
[root@centos8 zabbix-4.0.24]#tree /apps/zabbix_agent/
/apps/zabbix_agent/
├── bin
│ ├── zabbix_get
│ └── zabbix_sender
├── etc
│ ├── zabbix_agentd.conf
│ └── zabbix_agentd.conf.d
├── lib
│ └── modules
├── sbin
│ └── zabbix_agentd
└── share
└── man
├── man1
│ ├── zabbix_get.1
│ └── zabbix_sender.1
└── man8
└── zabbix_agentd.8

#修改配置
[root@centos8 ~]#HOST=`hostname -I`
[root@centos8 ~]#sed -i.bak -e "s/Server=127.0.0.1/Server=10.0.0.100/" -e "s/Hostname=Zabbix server/Hostname=$HOST/" /apps/zabbix_agent/etc/zabbix_agentd.conf

#创建service文件
[root@centos8 ~]#vim /lib/systemd/system/zabbix-agent.service
[Unit]
Description=Zabbix Agent
After=syslog.target
After=network.target

[Service]
Type=forking
Restart=on-failure
PIDFile=/tmp/zabbix_agentd.pid
KillMode=control-group
ExecStart=/apps/zabbix_agent/sbin/zabbix_agentd -c
/apps/zabbix_agent/etc/zabbix_agentd.conf
ExecStop=/bin/kill -SIGTERM $MAINPID
RestartSec=10s
User=zabbix
Group=zabbix

[Install]
WantedBy=multi-user.target

[root@centos8 ~]#systemctl daemon-reload
[root@centos8 ~]#systemctl enable --now zabbix-agent.service
[root@centos8 ~]#ss -ntl
State Recv-Q Send-Q Local Address:Port Peer
Address:Port
LISTEN 0 128 0.0.0.0:22
0.0.0.0:*
LISTEN 0 100 127.0.0.1:25
0.0.0.0:*
LISTEN 0 128 0.0.0.0:10050
0.0.0.0:*
LISTEN 0 128 [::]:22
[::]:*
LISTEN 0 100 [::1]:25
[::]:*
一键编译安装 Zabbix Agent 脚本
范例1: CentOS和Ubuntu 通用
[root@ubuntu1804 ~]#cat install_zabbix_agent_src.sh
#!/bin/bash
ZABBIX_VER=5.0.13
FILE=zabbix-${ZABBIX_VER}.tar.gz
INSTALL_DIR=/apps/zabbix_agent
SERVER=10.0.0.100
HOST=`hostname -I`

. /etc/os-release

color () {
    RES_COL=60
    MOVE_TO_COL="echo -en \\033[${RES_COL}G"
    SETCOLOR_SUCCESS="echo -en \\033[1;32m"
    SETCOLOR_FAILURE="echo -en \\033[1;31m"
    SETCOLOR_WARNING="echo -en \\033[1;33m"
    SETCOLOR_NORMAL="echo -en \E[0m"
    echo -n "$1" && $MOVE_TO_COL
    echo -n "["
    if [ $2 = "success" -o $2 = "0" ] ;then
    	${SETCOLOR_SUCCESS}
    	echo -n $" OK "
    elif [ $2 = "failure" -o $2 = "1" ] ;then
        ${SETCOLOR_FAILURE}
        echo -n $"FAILED"
    else
        ${SETCOLOR_WARNING}
        echo -n $"WARNING"
	fi
    ${SETCOLOR_NORMAL}
    echo -n "]"
    echo
}

check(){
	wget https://cdn.zabbix.com/zabbix/sources/stable/${ZABBIX_VER%.*}/zabbix-$ZABBIX_VER.tar.gz
	[ -e ${FILE} ] || { color "$FILE 文件不存在,请检查" 1 ; exit 1; }
}

prepare (){
    if [ $ID = "centos" $ID = "rocky" ];then
    yum -y install gcc make pcre-devel || { color "zabbix agent 相关包安装失败,请检查" 1 ;exit; }
	else
		apt -y install gcc make || { color "zabbix agent 相关包安装失败,请检查" 1 ;exit; }
	fi
	id zabbix &> /dev/null || useradd -r zabbix
}

install() {
    tar xf $FILE
    cd zabbix-$ZABBIX_VER
    ./configure --prefix=${INSTALL_DIR} --enable-agent
    make && make install
}

config () {
	sed -i.bak -e "s/Server=127.0.0.1/Server=$SERVER/" -e "s/Hostname=Zabbix server/Hostname=$HOST/" ${INSTALL_DIR}/etc/zabbix_agentd.conf
	echo 'PATH=${INSTALL_DIR}/bin/:${INSTALL_DIR}/sbin/:$PATH' > /etc/profile.d/zabbix_agent.sh
}

service (){
	cat > /lib/systemd/system/zabbix-agent.service <<EOF
[Unit]
Description=Zabbix Agent
After=syslog.target
After=network.target

[Service]
Type=forking
Restart=on-failure
PIDFile=/tmp/zabbix_agentd.pid
KillMode=control-group
ExecStart=${INSTALL_DIR}/sbin/zabbix_agentd -c
${INSTALL_DIR}/etc/zabbix_agentd.conf
ExecStop=/bin/kill -SIGTERM $MAINPID
RestartSec=10s
User=zabbix
Group=zabbix

[Install]
WantedBy=multi-user.target

EOF
    systemctl daemon-reload
    systemctl enable --now zabbix-agent.service
    systemctl is-active zabbix-agent.service && color "Zabbix Agent 安装完成并启动"0
}
check
prepare
install
config
service
利用 Ansible 批量部署 Zabbix Agent
范例: 部署Zabbix agent2
[root@ubuntu2004 ~]#cat install_zabbix_agent2.yaml
---
- name: install zabbix_agent2
  hosts: all
  serial: 2
  vars:
    - ZX_SERVER: "zabbix.wang.org"
	- ZX_VER: "5.0"
	- ZX_URL: "https://mirror.tuna.tsinghua.edu.cn/zabbix"

  tasks:
	- name: rocky8
	  block:
		- name: rocky repo
		  shell: "rpm -Uvh {{ ZX_URL }}/zabbix/{{ ZX_VER }}/rhel/8/x86_64/zabbix-release-{{ ZX_VER }}-1.el8.noarch.rpm"
		  ignore_errors: yes
		- name: replace uri
		  replace:
		    path: /etc/yum.repos.d/zabbix.repo
			regexp: "http://repo.zabbix.com"
			replace: "{{ ZX_URL }}"
		- name: rocky install
		  yum:
			name: zabbix-agent2
			state: present
	  when: ansible_distribution_file_variety == "RedHat"

	- name: ubuntu2004
	  block:
		- name: ubuntu apt
		  shell: "wget {{ ZX_URL }}/zabbix/{{ ZX_VER }}/ubuntu/pool/main/z/zabbix-release/zabbix-release_{{ ZX_VER }}-1+focal_all.deb"
		- name: dpkg
		  shell: "dpkg -i zabbix-release_{{ ZX_VER }}-1+focal_all.deb"
		- name: replace uri
		  replace:
			path: /etc/apt/sources.list.d/zabbix.list
            regexp: "http://repo.zabbix.com"
            replace: "{{ ZX_URL }}"
		- name: apt
          apt:
            update_cache: yes
            name: zabbix-agent2
            state: present
	  when: ansible_distribution_file_variety == "Debian"

	- name: config hostname
	  replace:
        path: /etc/zabbix/zabbix_agent2.conf
        regexp: "Hostname=Zabbix server"
        replace: "Hostname={{ ansible_eth0.ipv4.address }}"
	  notify:
		- restart agent2

	- name: config Server
	  replace:
        path: /etc/zabbix/zabbix_agent2.conf
        regexp: "Server=127.0.0.1"
        replace: "Server={{ ZX_SERVER }}"
	  notify:
		- restart agent2

	- name: service
	  service:
        name: zabbix-agent2.service
        state: started
        enabled: yes
	handlers:
	  - name: restart agent2
		service:
		  name: zabbix-agent2.service
		  state: restarted
范例: 部署Zabbix agent
#先实现所有被监控主机的ssh key 验证
过程略
#由于ansible是在Ubuntu上安装,需要在所有Zabbix Agent上安装python环境
ansible all -m raw -a "apt-get update && apt-get install -y python3"
[root@ubuntu1804 ~]#ln -s python3 /usr/bin/python
[root@centos8 ~]# yum -y install python3 && ln -s python3 /usr/bin/python

#安装ansible
[root@zabbix-server ~]#apt -y install ansible

[root@zabbix-server ~]#grep -Ev "^$|#" /etc/ansible/hosts
[web]
10.0.0.[7:9]

#检查环境
[root@zabbix-server ~]#ansible web -m ping
10.0.0.7 | SUCCESS => {
"changed": false,
"ping": "pong"
}
10.0.0.8 | SUCCESS => {
"changed": false,
"ping": "pong"
}
10.0.0.9 | SUCCESS => {
"changed": false,
"ping": "pong"
}
[root@zabbix-server ~]#ls /opt
install_zabbix_agent.yml templates

[root@zabbix-server ~]#grep -Ev '^$|#' /opt/templates/zabbix_agentd.conf.j2
PidFile=/var/run/zabbix/zabbix_agentd.pid
LogFile=/var/log/zabbix/zabbix_agentd.log
LogFileSize=0
Server={{ zabbix_server }}
ServerActive={{ zabbix_server }}
Hostname={{ ansible_eth0.ipv4.address }}
Include=/etc/zabbix/zabbix_agentd.d/*.conf

#开始批量部署
[root@zabbix-server ~]#ansible-playbook /opt/install_zabbix_agent.yml
#验证安装是否成功
[root@ubuntu1804 ~]#zabbix_agentd -V
zabbix_agentd (daemon) (Zabbix) 5.0.14
Revision 892ce506db 16 July 2021, compilation time: Jul 16 2021 14:45:07
Copyright (C) 2021 Zabbix SIA
License GPLv2+: GNU GPL version 2 or later <http://gnu.org/licenses/gpl.html>.
This is free software: you are free to change and redistribute it according to
the license. There is NO WARRANTY, to the extent permitted by law.
This product includes software developed by the OpenSSL Project
for use in the OpenSSL Toolkit (http://www.openssl.org/).
Compiled with OpenSSL 1.1.1 11 Sep 2018
Running with OpenSSL 1.1.1 11 Sep 2018
[root@ubuntu1804 ~]#systemctl is-active zabbix-agent.service
active
利用 zabbix_get 工具测试 Zabbix Agent 是否正常
利用 zabbix_get 工具可以测试 Zabbix Agent 是否正常
Zabbix Agent 内置的监控项
https://www.zabbix.com/documentation/5.0/zh/manual/config/items/itemtypes/zabbix_agent
不同平台支持 Zabbix agent监控项:
https://www.zabbix.com/documentation/5.0/zh/manual/appendix/items/supported_by_platform
范例: Ubuntu20.04安装 Zabbix_get
[root@ubuntu2004 ~]#wget https://repo.zabbix.com/zabbix/6.0/ubuntu/pool/main/z/zabbix-release/zabbix-release_6.0-1+ubuntu20.04_all.deb
[root@ubuntu2004 ~]#dpkg -i zabbix-release_6.0-1+ubuntu20.04_all.deb
[root@ubuntu2004 ~]#apt update
[root@ubuntu2004 ~]#apt -y install zabbix-get
[root@ubuntu2004 ~]#zabbix_get -V
zabbix_get (Zabbix) 6.0.5
Revision 8da3e1f8419 30 May 2022, compilation time: May 30 2022 06:40:36
Copyright (C) 2022 Zabbix SIA
License GPLv2+: GNU GPL version 2 or later <http://gnu.org/licenses/gpl.html>.
This is free software: you are free to change and redistribute it according to
the license. There is NO WARRANTY, to the extent permitted by law.
This product includes software developed by the OpenSSL Project
for use in the OpenSSL Toolkit (http://www.openssl.org/).
Compiled with OpenSSL 1.1.1f 31 Mar 2020
Running with OpenSSL 1.1.1f 31 Mar 2020
范例: Rocky8 安装 zabbix_get
[root@rocky8 ~]#rpm -ivh https://mirror.tuna.tsinghua.edu.cn/zabbix/zabbix/6.0/rhel/8/x86_64/zabbix-get-6.0.5-1.el8.x86_64.rpm
[root@rocky8 ~]#zabbix_get -V
zabbix_get (Zabbix) 6.0.5
Revision 8da3e1f8419 30 May 2022, compilation time: May 30 2022 13:41:39
Copyright (C) 2022 Zabbix SIA
License GPLv2+: GNU GPL version 2 or later <http://gnu.org/licenses/gpl.html>.
This is free software: you are free to change and redistribute it according to
the license. There is NO WARRANTY, to the extent permitted by law.
This product includes software developed by the OpenSSL Project
for use in the OpenSSL Toolkit (http://www.openssl.org/).
Compiled with OpenSSL 1.1.1g FIPS 21 Apr 2020
Running with OpenSSL 1.1.1k FIPS 25 Mar 2021
范例: 使用zabbix_get 工具查看验证agent是否正常
#返回1表示正常
[root@zabbix-server ~]#/apps/zabbix_server/bin/zabbix_get -s 10.0.0.103 -p 10050 -k "agent.ping"
1
[root@zabbix-server ~]#/apps/zabbix_server/bin/zabbix_get -s 127.0.0.1 -p 10050 -k "agent.ping"
1

#故障现象,可能为agent主机的网络不通导致,agent服务没有启动,配置错误如:Server错误地址,StartAgents=0等
[root@zabbix-server ~]#/apps/zabbix_server/bin/zabbix_get -s 10.0.0.102 -p 10050
-k "agent.ping"
zabbix_get [9147]: Get value error: cannot connect to [[10.0.0.102]:10050]: [113]
No route to host

#故障现象,一般为主标主机没有启动agent
[root@zabbix-server ~]#zabbix_get -s 10.0.0.7 -p 10050 -k "agent.ping"
zabbix_get [19982]: Get value error: cannot connect to [[10.0.0.7]:10050]: [111]
Connection refused

#故障现象,agent 没有将server指令指向server的地址,导致server无法获取agent的信息
[root@zabbix-server ~]#/apps/zabbix_server/bin/zabbix_get -s 10.0.0.100 -p 10050 -k "agent.ping"
zabbix_get [9162]: Check access restrictions in Zabbix agent configuration
范例: 利用zabbix_get 获取指定的监控项
[root@zabbix-server ~]#zabbix_get -s 10.0.0.8 -p 10050 -k "system.hostname"
centos8.ayaka.org
[root@zabbix-server ~]#zabbix_get -s 10.0.0.8 -p 10050 -k "system.uname"
Linux centos8.magedu.org 4.18.0-240.el8.x86_64 #1 SMP Fri Sep 25 19:48:47 UTC
2020 x86_64
[root@zabbix-server ~]#zabbix_get -s 10.0.0.8 -p 10050 -k "system.users.num"
2

#检查端口是否打开
[root@zabbix-server ~]#zabbix_get -s 10.0.0.8 -p 10050 -k "net.tcp.port[,22]"
1

#查看sshd进程数
[root@zabbix-server ~]#zabbix_get -s 10.0.0.8 -p 10050 -k "proc.num[sshd,,,]"
3

#查看zabbix_agentd进程数
[root@zabbix-server ~]#zabbix_get -s 10.0.0.8 -p 10050 -k 'proc.num[zabbix_agentd]'
6
范例: 使用Zabbix WEB 测试是否agent 正常
Zabbix Agent2 安装和配置
Agent2 使用说明
https://www.zabbix.com/documentation/5.0/zh/manpages/zabbix_agent2
范例: Rocky8 安装Zabbix Agent2
#从国内镜像下载
[root@rocky8 ~]#rpm -ivh https://mirror.tuna.tsinghua.edu.cn/zabbix/zabbix/6.0/rhel/8/x86_64/zabbix-agent2-6.0.5-1.el8.x86_64.rpm

[root@rocky8 ~]#rpm -ql https://mirror.tuna.tsinghua.edu.cn/zabbix/zabbix/6.0/rhel/8/x86_64/zabbix-agent2-6.0.5-1.el8.x86_64.rpm
warning:
https://mirror.tuna.tsinghua.edu.cn/zabbix/zabbix/6.0/rhel/8/x86_64/zabbix-
agent2-6.0.5-1.el8.x86_64.rpm: Header V4 RSA/SHA512 Signature, key ID a14fe591:
NOKEY
/etc/logrotate.d/zabbix-agent2
/etc/zabbix/zabbix_agent2.conf
/etc/zabbix/zabbix_agent2.d
/etc/zabbix/zabbix_agent2.d/plugins.d/ceph.conf
/etc/zabbix/zabbix_agent2.d/plugins.d/docker.conf
/etc/zabbix/zabbix_agent2.d/plugins.d/memcached.conf
/etc/zabbix/zabbix_agent2.d/plugins.d/modbus.conf
/etc/zabbix/zabbix_agent2.d/plugins.d/mongodb.conf
/etc/zabbix/zabbix_agent2.d/plugins.d/mqtt.conf
/etc/zabbix/zabbix_agent2.d/plugins.d/mysql.conf
/etc/zabbix/zabbix_agent2.d/plugins.d/oracle.conf
/etc/zabbix/zabbix_agent2.d/plugins.d/postgres.conf
/etc/zabbix/zabbix_agent2.d/plugins.d/redis.conf
/etc/zabbix/zabbix_agent2.d/plugins.d/smart.conf
/usr/lib/.build-id
/usr/lib/.build-id/88
/usr/lib/.build-id/88/e20f765be60a306e65225d3110fae01371ddee
/usr/lib/systemd/system/zabbix-agent2.service
/usr/lib/tmpfiles.d/zabbix_agent2.conf
/usr/sbin/zabbix_agent2
/usr/share/doc/zabbix-agent2
/usr/share/doc/zabbix-agent2/AUTHORS
/usr/share/doc/zabbix-agent2/COPYING
/usr/share/doc/zabbix-agent2/ChangeLog
/usr/share/doc/zabbix-agent2/NEWS
/usr/share/doc/zabbix-agent2/README
/usr/share/man/man8/zabbix_agent2.8.gz
/var/log/zabbix
/var/run/zabbix

[root@rocky8 ~]#vim /etc/zabbix/zabbix_agent2.conf
Server=zabbix.ayaka.org

[root@rocky8 ~]#systemctl enable --now zabbix-agent2.service

[root@rocky8 ~]#ss -ntlp|grep zabbix
LISTEN 0 128 *:10050 *:* users:
(("zabbix_agent2",pid=22792,fd=8))

#Zabbix Server 测试连接
[root@zabbix-server ~]#zabbix_get -s 10.0.0.8 -k agent.ping
1
范例: 安装和配置Zabbix agent2
#如果已安装zabbix-agent,先停止agent防止端口10050/tcp冲突
[root@ubuntu1804 ~]#systemctl disable --now zabbix-agent

#安装
[root@ubuntu1804 ~]#apt -y install zabbix-agent2
[root@centos8 ~]#yum -y install zabbix-agent2

#配置文件和agent相同
[root@ubuntu1804 ~]#grep -vE '^$|#' /etc/zabbix/zabbix_agent2.conf
PidFile=/var/run/zabbix/zabbix_agent2.pid
LogFile=/var/log/zabbix/zabbix_agent2.log
LogFileSize=0
Server=10.0.0.100 #修改此行
ServerActive=127.0.0.1
Hostname=Zabbix server
Include=/etc/zabbix/zabbix_agent2.d/*.conf
ControlSocket=/tmp/agent.sock
[root@ubuntu1804 ~]#systemctl restart zabbix-agent2

#在Zabbix Server测试
[root@zabbix-server ~]#zabbix_get -s 10.0.0.9 -k 'agent.ping'
1

#agent2是多线程
[root@rocky8 ~]#pstree -p|grep zabbix_agent2
	`-zabbix_agent2(1825)-+-{zabbix_agent2}(1826)
            |-{zabbix_agent2}(1827)
            |-{zabbix_agent2}(1828)
            |-{zabbix_agent2}(1829)
            |-{zabbix_agent2}(1830)
            |-{zabbix_agent2}(1831)
            `-{zabbix_agent2}(1833)

#agent是多进程
[root@rocky8 ~]#pstree -p | grep zabbix_agent
		`-zabbix_agentd(1448)-+-zabbix_agentd(1449)
                |-zabbix_agentd(1450)
                |-zabbix_agentd(1451)
                |-zabbix_agentd(1452)
                `-zabbix_agentd(1453)
案例: 将Zabbix Server的 MySQL 数据库迁移到独立的MySQL 服务器
#停止 Zabbix 服务
[root@zabbix-server ~]#systemctl stop zabbix-server.service

#备份数据库
[root@zabbix-server ~]#mysqldump -uroot -A -F --single-transaction > /data/all.sql

[root@zabbix-server ~]#systemctl disable --now mysql

#在独立数据库服务器上安装并恢复数据库
[root@mysql-server ~]#apt update && apt -y install mysql-server
[root@mysql-server ~]#vim /etc/mysql/mysql.conf.d/mysqld.cnf
#注释两行
#bind-address = 127.0.0.1
#mysqlx-bind-address = 127.0.0.1
[root@mysql-server ~]#systemctl restart mysql

[root@mysql-server ~]#mysql < all.sql

#重新授权用户允许远程连接zabbix数据库
[root@mysql-server ~]#mysql
mysql>create user zabbix@'10.0.0.%' identified by '123456';
mysql>grant all privileges on zabbix.* to zabbix@'10.0.0.%';

#将php的配置指向新的数据库服务器IP
[root@ubuntu2204 ~]#ll /usr/share/zabbix/conf/zabbix.conf.php
lrwxrwxrwx 1 www-data www-data 31 3月 8 20:23
/usr/share/zabbix/conf/zabbix.conf.php -> /etc/zabbix/web/zabbix.conf.php

[root@zabbix-server ~]#vim /usr/share/zabbix/conf/zabbix.conf.php
$DB['SERVER'] = '10.0.0.101';

#将Zabbix Server的配置指向新的数据库服务器IP
[root@zabbix-server ~]#vim /etc/zabbix/zabbix_server.conf
DBHost=10.0.0.101
DBPort=3306

#重启服务生效
[root@zabbix-server ~]#systemctl start zabbix-server.service